Proxmox
This is an opinionated proxmox guide with how I personally setup Proxmox.
Requirements
What you will need.
2 computers, one for Proxmox and anohter to ssh into Proxmox and setup the website GUI.
USB stick or external drive to install and boot the Proxmox installation from.
Hardware that meets the System Requirements for running Promxox
Promxox Installation
Download the latest Proxmox ISO which when this guide was made was V.9.0-1.
Then download Rufus which we will use to install Proxmox to an external USB or drive.
Install Proxmox ISO to an USB
Open Rufus
Click on “SELECT” and open the downloaded Proxmox ISO file
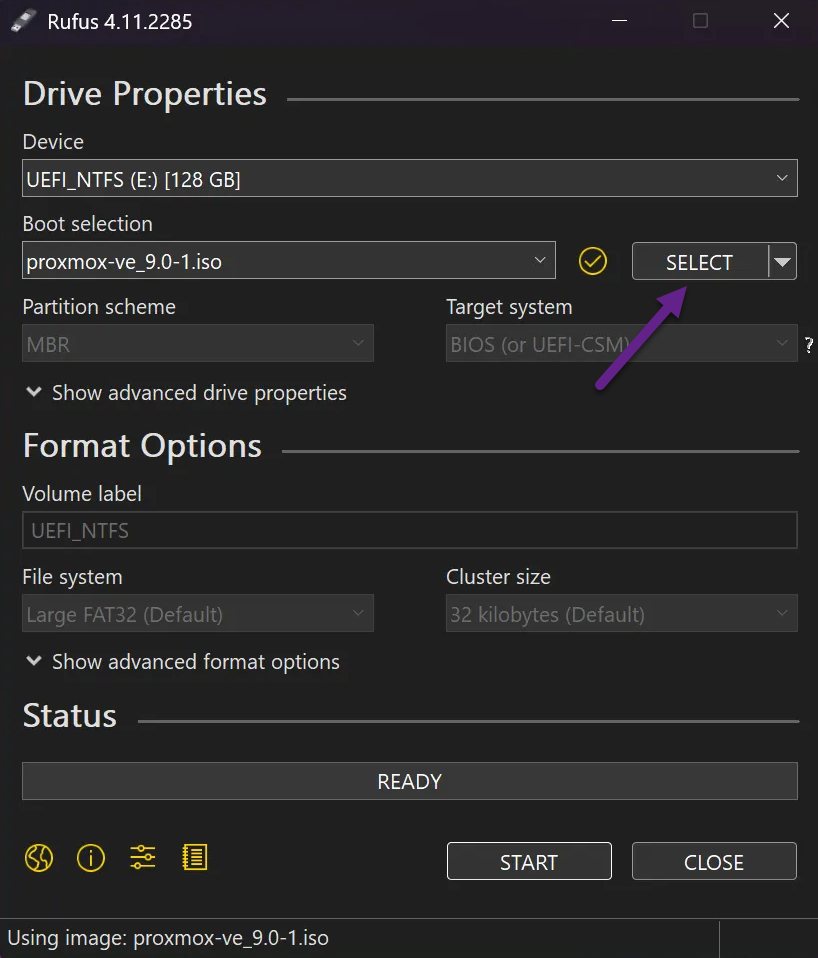
Rufus should automatically detect DD (byte-for-byte) mode as it’s a requirement for the Proxmox ISO file to work and foce select it.
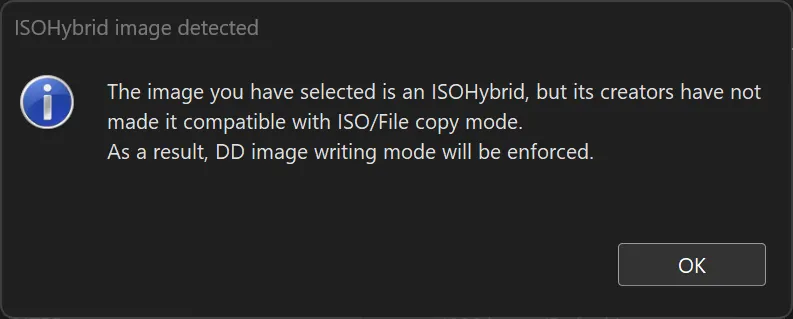
If you don’t see this pop-up don’t worry. You should be asked instead when clicking on “START” and then select DD mode in that case.
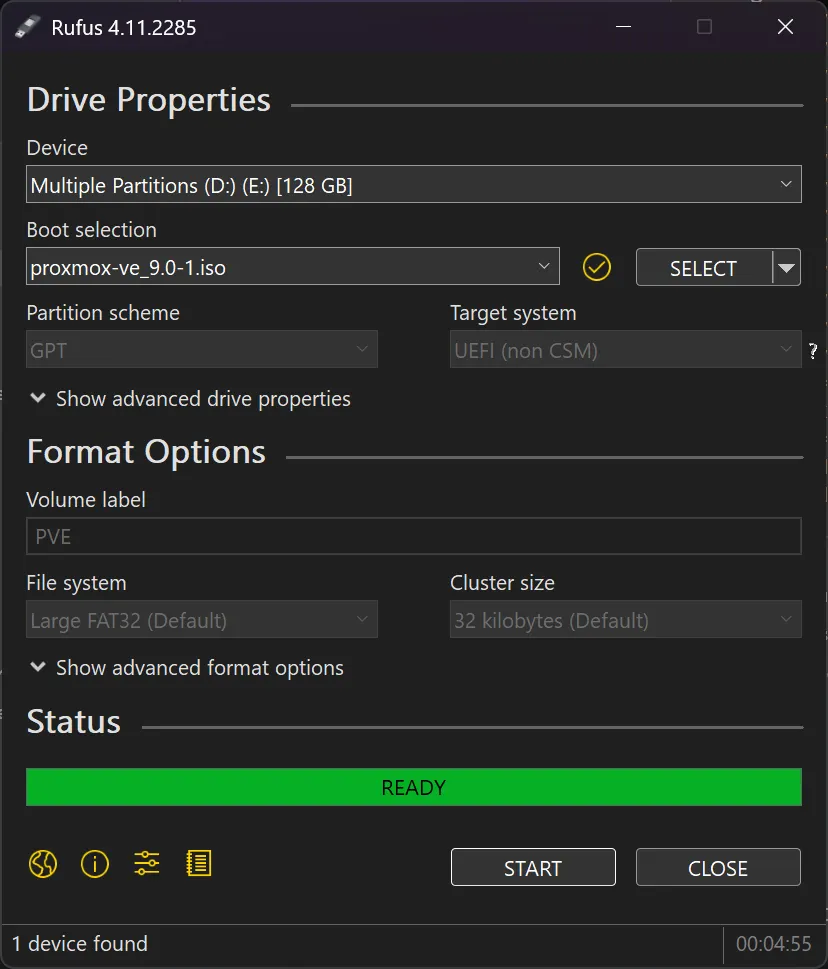
Detach the USB and boot the computer from the USB drive.
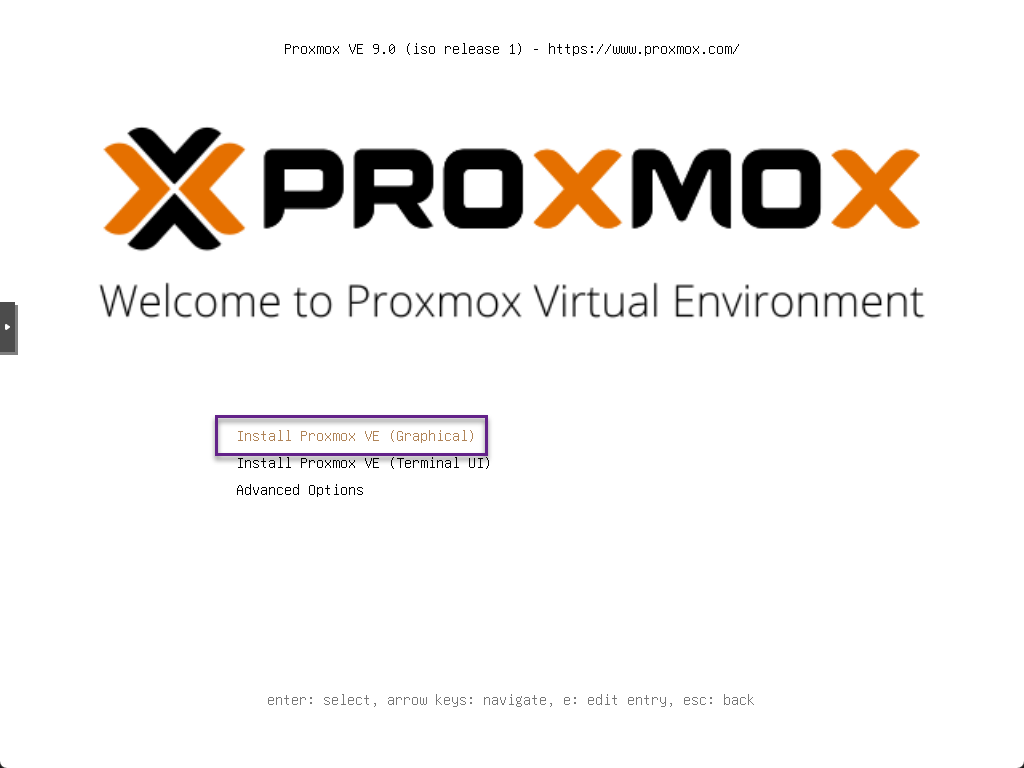
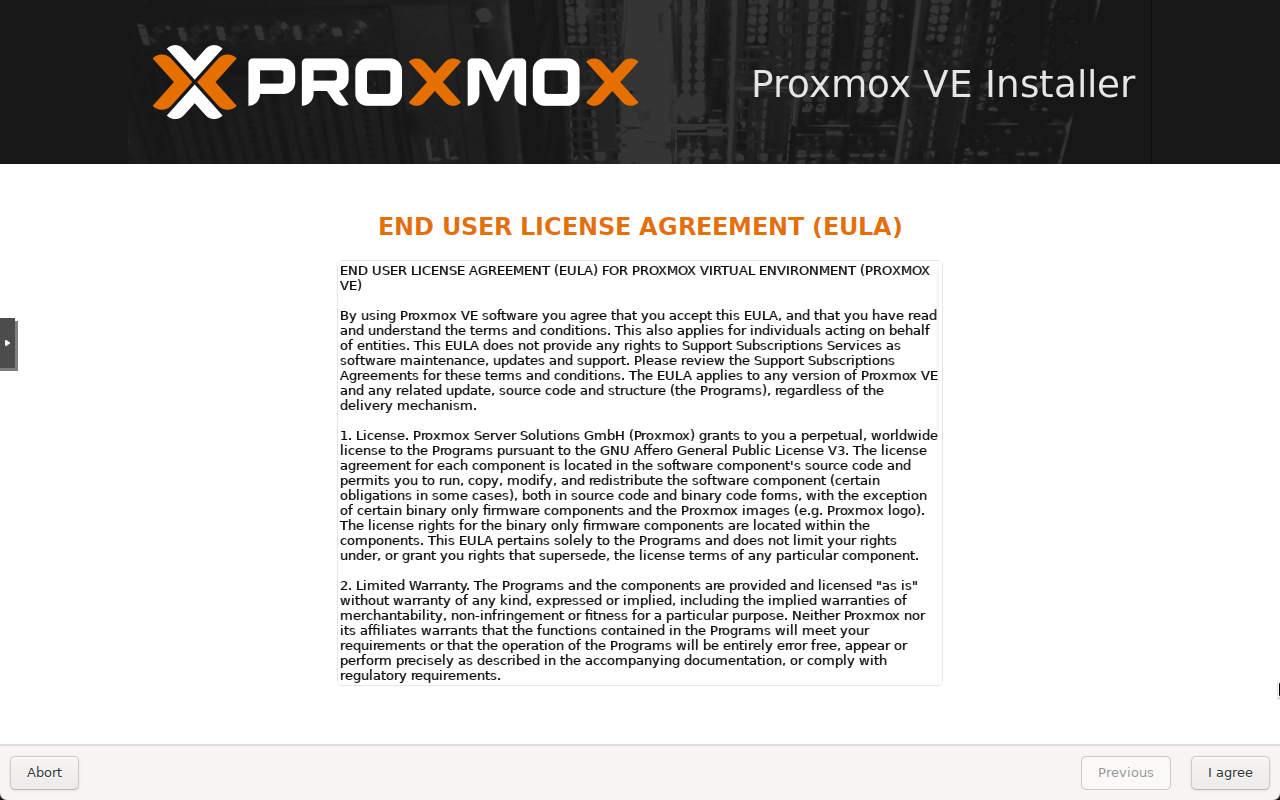
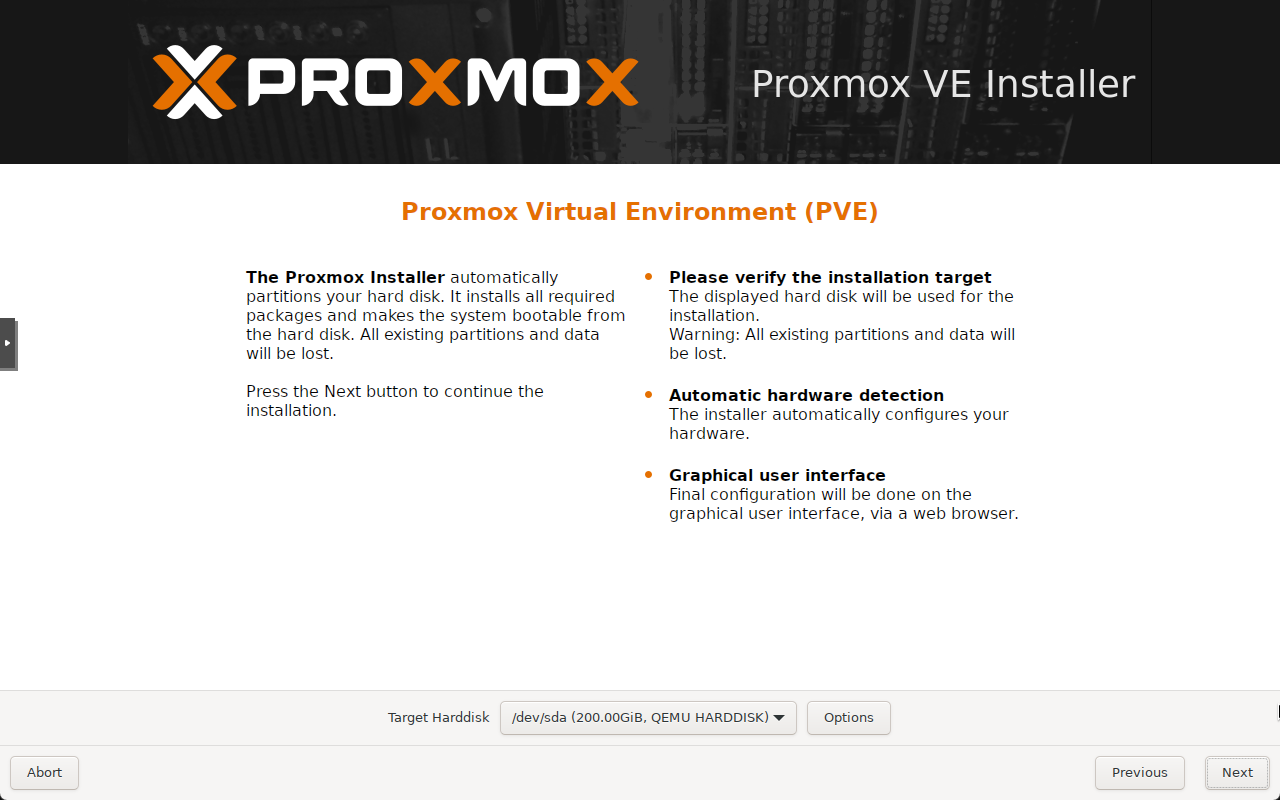
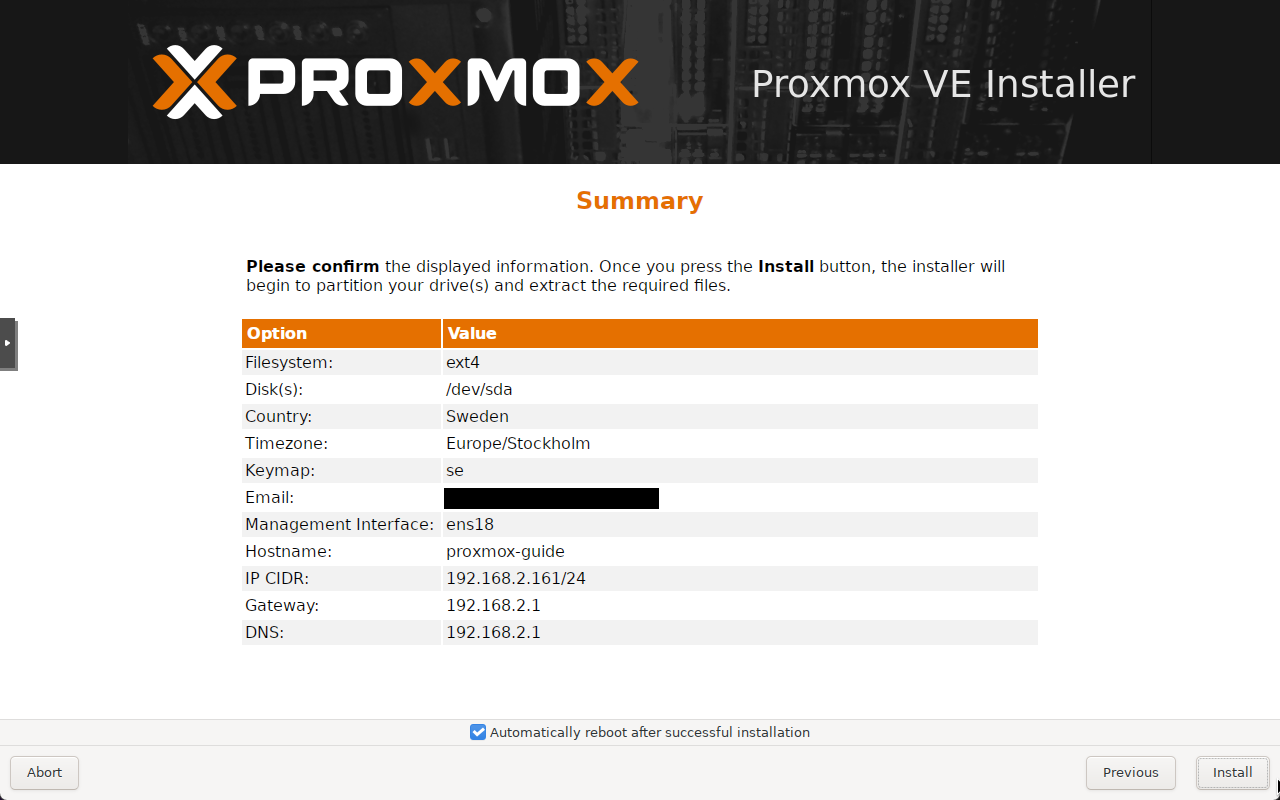
Follow below image or go to https://pve.proxmox.com/wiki/Installation for a more thorogh walkthough of the setup options.
Select the drive where Proxmox should be installed on. We’ll leave the rest as default.
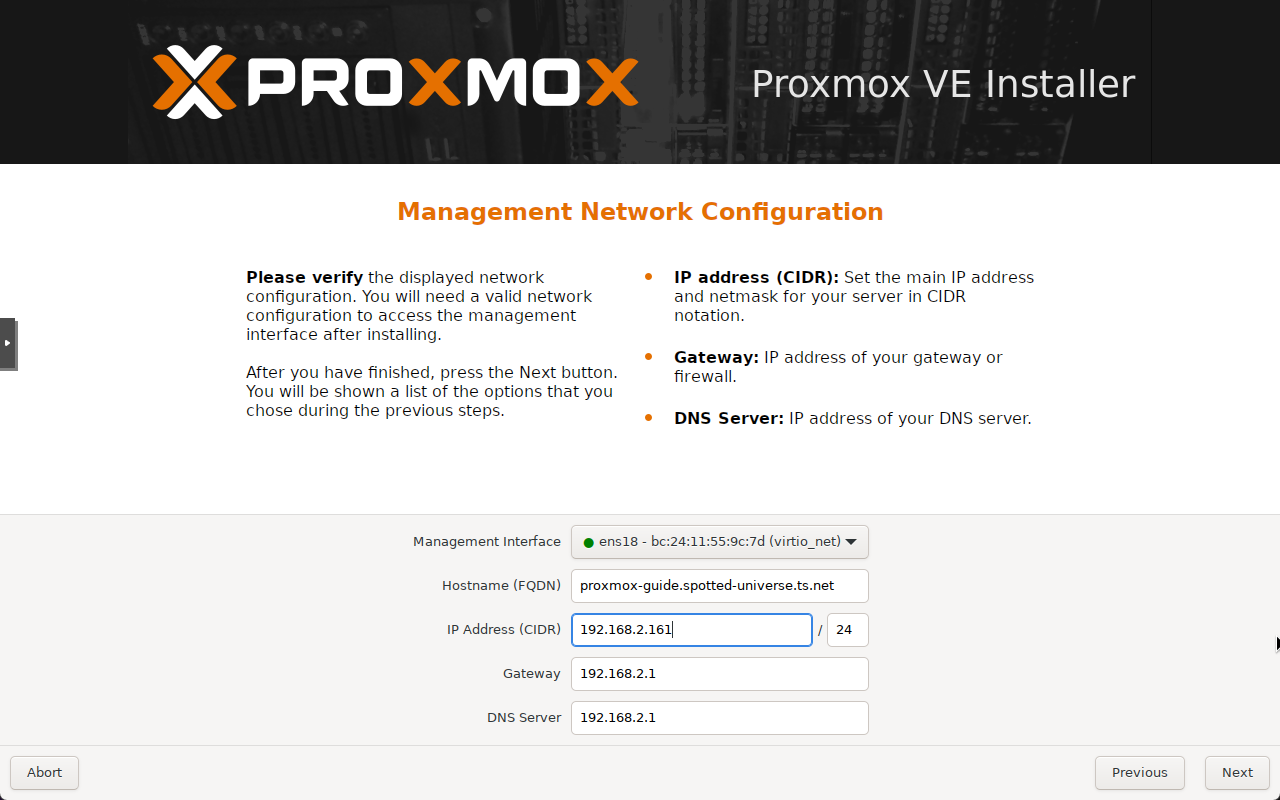
Proxmox network setup
If the computer is connected to a network with DHCP if will give itself an IP.
Note that this will be set statically so if the IP get’s reserverd by anohter computer in the future, proxmox will fail to get an IP address. So reserve the IP assiged to proxmox on your router so you won’t get any conflicts in the future.
[Optional] Using Tailcale in FQDN
If you will be using Tailscale you can use your Tailnet DNS name. What is Tailscale?
For example, mine is spotted-universe.ts.net and I want this proxmox machine to be named Proxmox-guide.
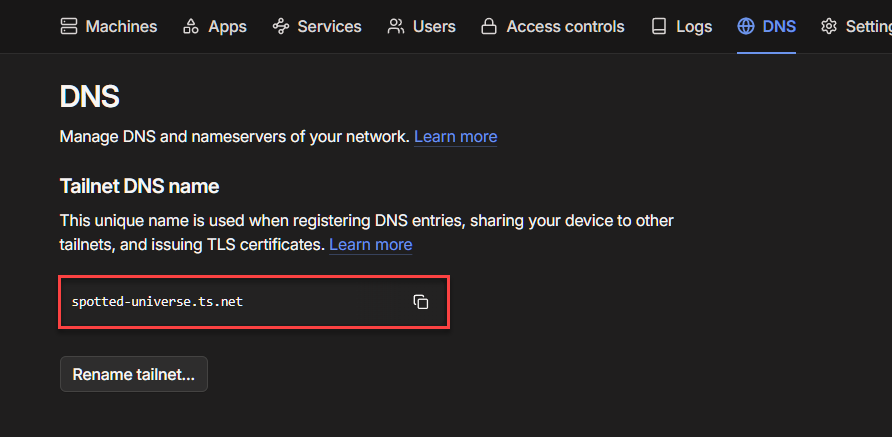
So I’ll use proxmox-guide.spotted-universe.ts.net
If you also want to use Tailscale, sign up for tailscale and once in, go to the DNS section.
https://login.tailscale.com/admin/dns
We will install Tailscale inside of Proxmox later on in this guide.
Use an invalid FQDN if not using Tailscale
You can use any of the below options.
1
2
3
.invalid
.test
.example
.localhost has also been reserved but should be avoided. .local has not been reserved but is widely used for such scenarios,
I personally would prefer [replace-with-proxmox-name].invalid if I didn’t use tailscale.
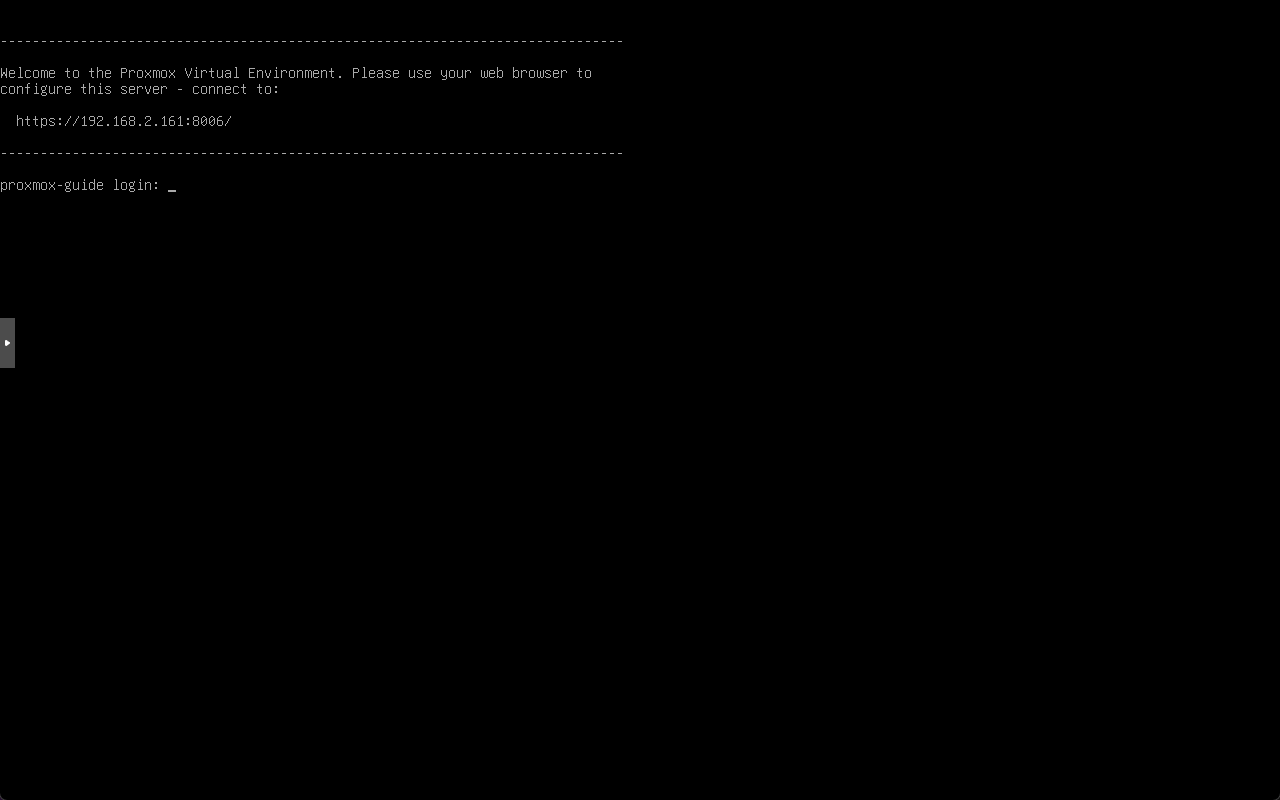
Once it has rebooted you should see this screen.
Now go to the URL displayed in a web browser.
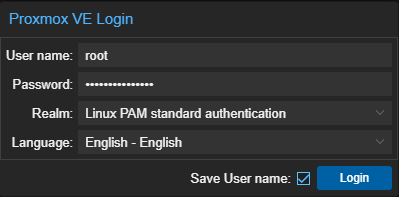
Sign in with the username root and the password set during the setup.
Set the Realm to Linux PAM standard authentication.
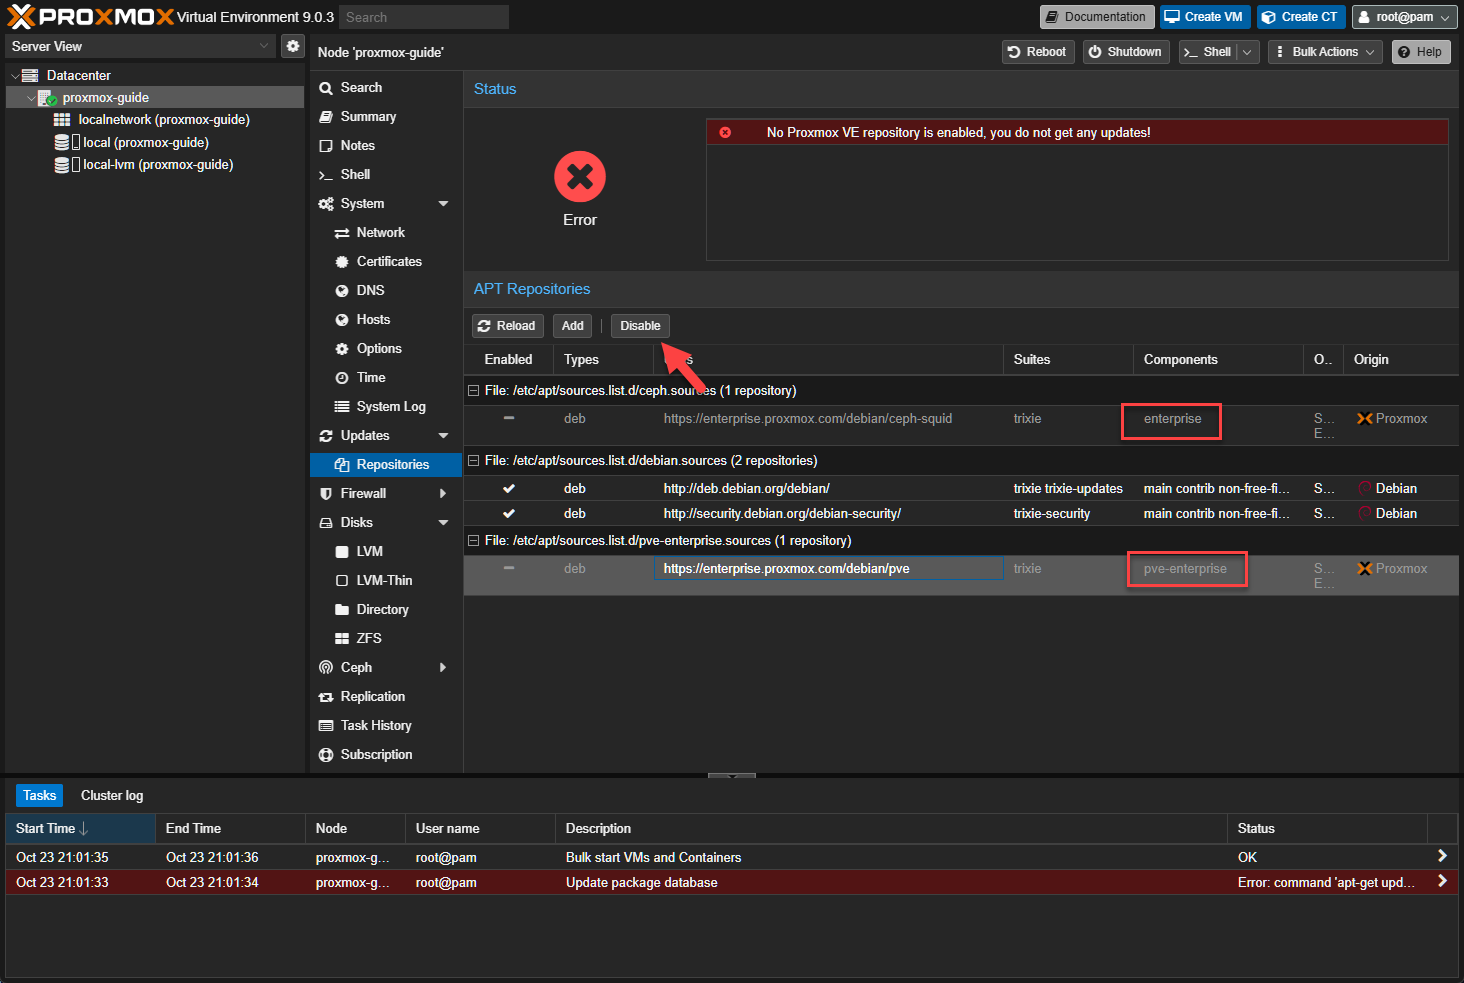
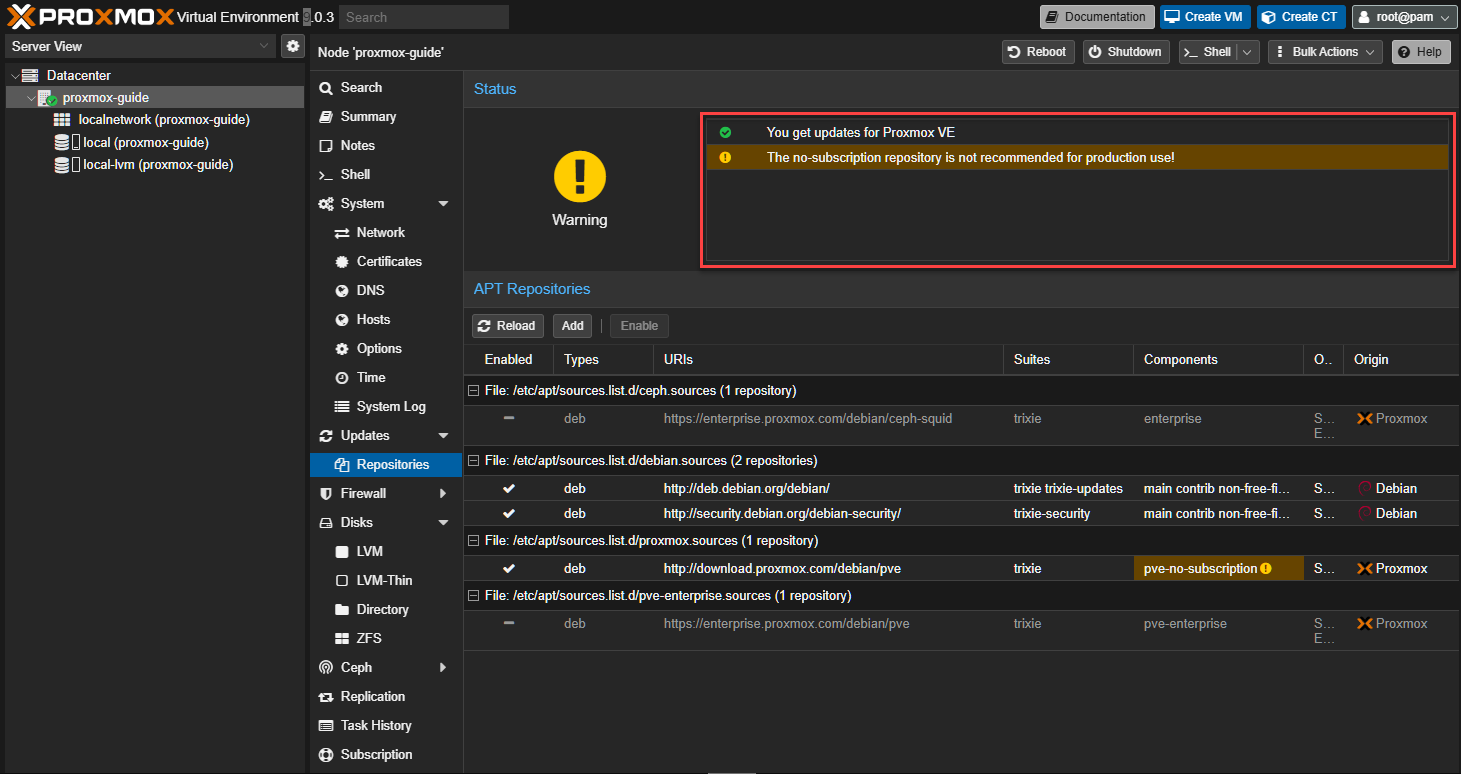
Modify repositories
By default Proxmox is set to use enterprise repositories to retrive updates.
We’ll change this to use the No-Subscription Repository instead as we won’t be paying for Proxmox.
First navigate to the repositories section in Proxmox
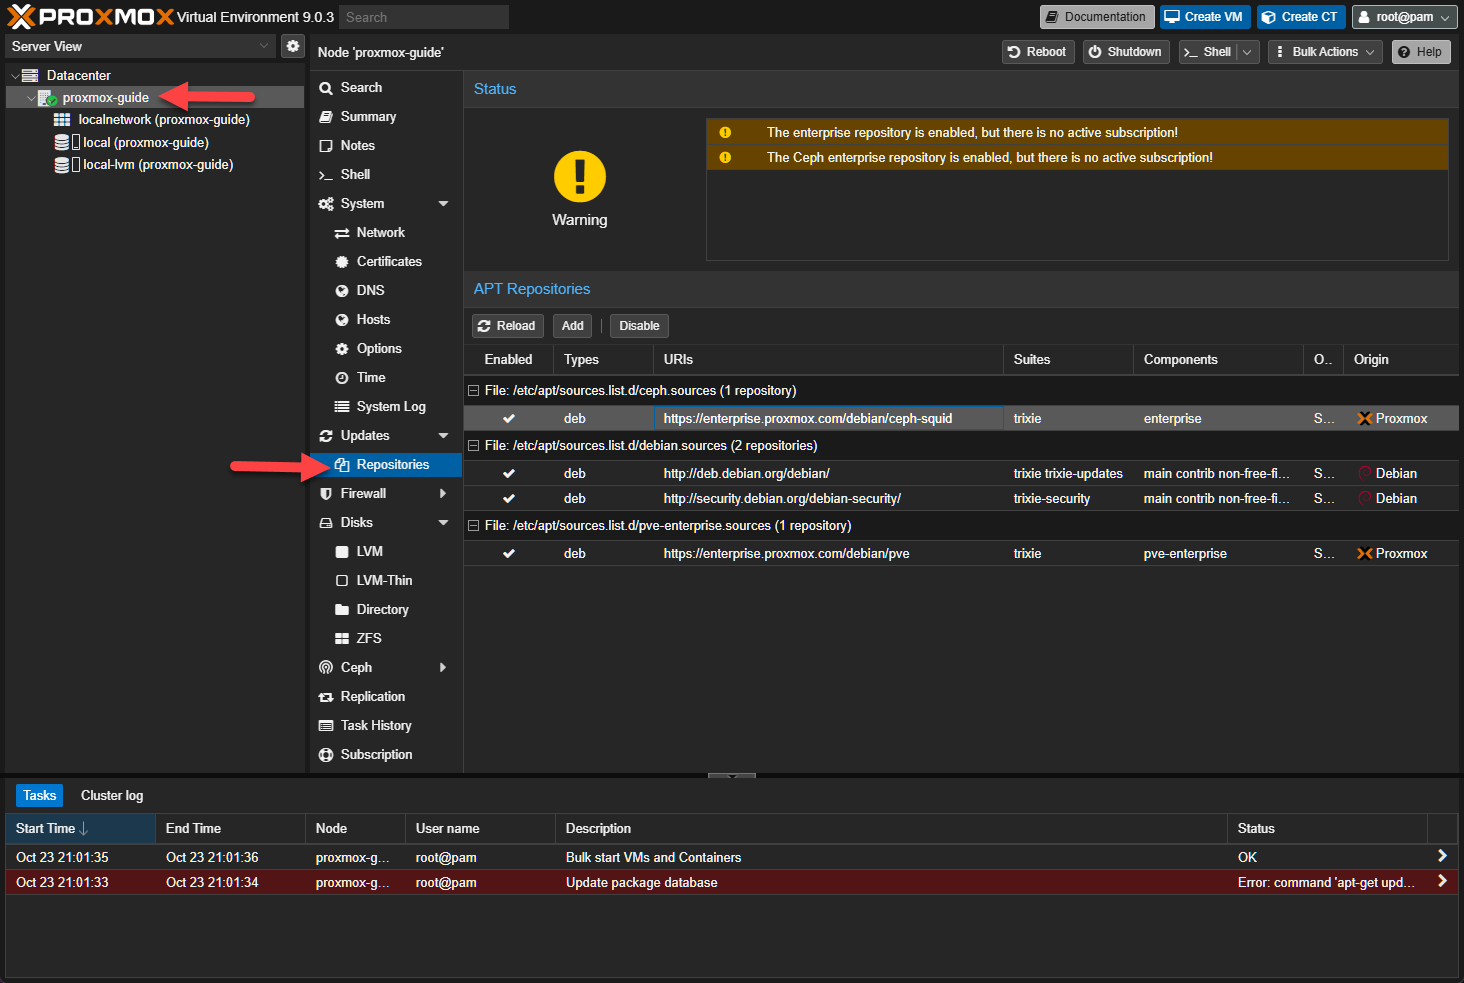
Disable the Repositories with enterprise in the Components field. Proxmox will warn that there isn’t any Proxmox Repository available for it to update from.
SSH
SSH into the proxmox machine (I personally use Termius)
The username will be the same root and the password used on the website.
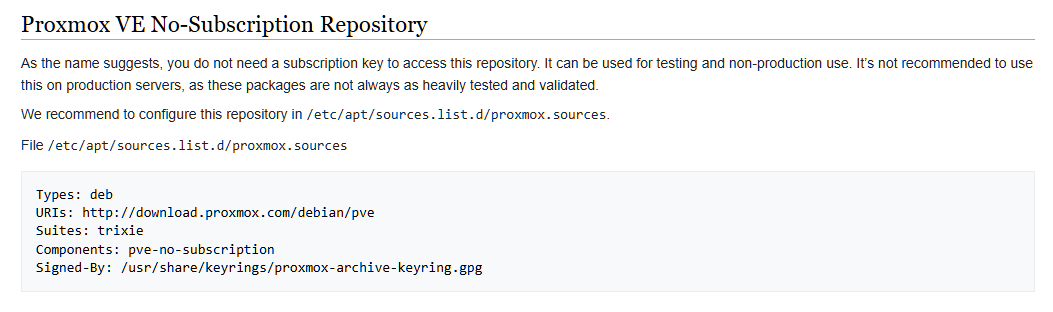
Proxmox Repositories
Once inside, copy the No-Subscription Repository text into /etc/apt/sources.list.d/proxmox.sources
The latest Proxmox Repositories can be found here https://pve.proxmox.com/wiki/Package_Repositories.
1
nano /etc/apt/sources.list.d/proxmox.sources
All all below to the file
1
2
3
4
5
Types: deb
URIs: http://download.proxmox.com/debian/pve
Suites: trixie
Components: pve-no-subscription
Signed-By: /usr/share/keyrings/proxmox-archive-keyring.gpg
The proxmox.sources file should look like this.
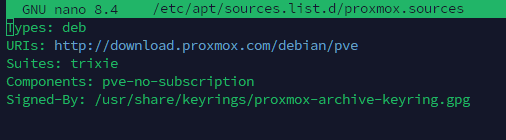
Save with Ctrl + o, Enter and then close it with Ctrl x
Debian Repositories
Now go to /etc/apt/sources.list
1
nano /etc/apt/sources.list
Paste in below
1
2
3
4
5
6
7
8
9
10
deb http://ftp.se.debian.org/debian trixie main contrib

deb http://ftp.se.debian.org/debian trixie-updates main contrib

# security updates
deb http://security.debian.org trixie-security main contrib

# PVE pve-no-subscription repository provided by proxmox.com,
# NOT recommended for production use
deb http://download.proxmox.com/debian/pve trixie pve-no-subscription
It should look like this.
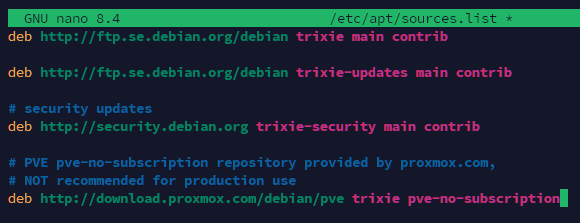
Save with Ctrl + o, Enter and then close it with Ctrl x
Update Proxmox
Now go back to the web GUI and refresh the website.
The red error should now change to a yellow warning.
Go to Updates and click Refresh
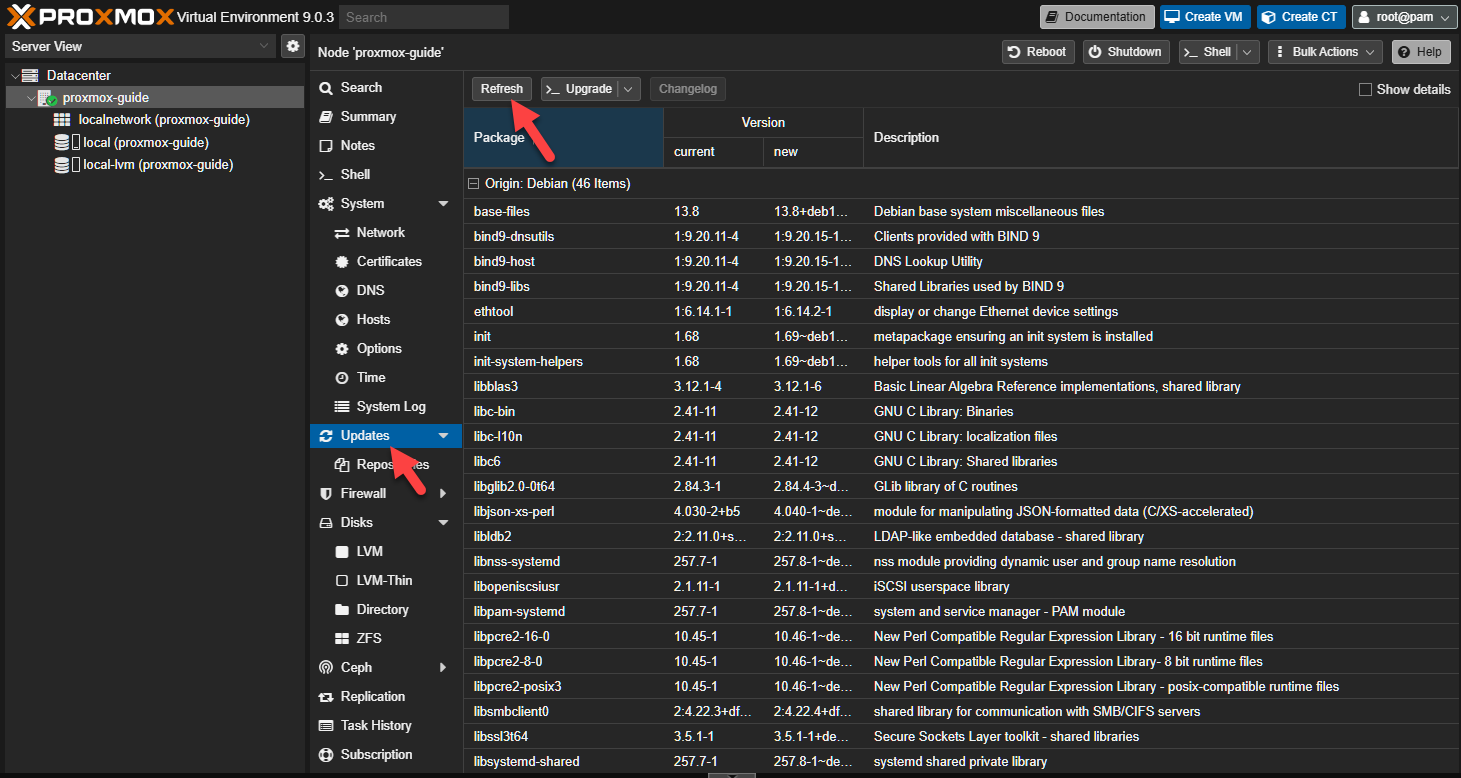
Click OK on the No Valid subscription

Once you see TASK OK close the window.

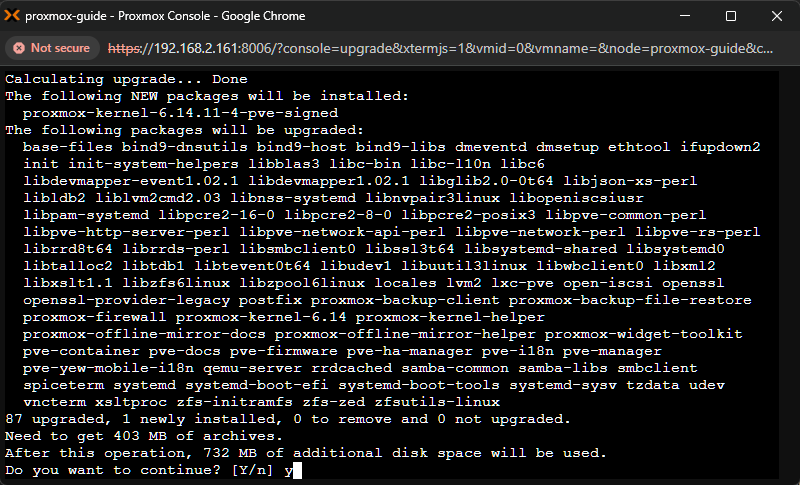
Type in Y and press Enter to start the updates
[Optional] Remove the “No vaild subscription pop-up
SSH into the Proxmox machine again.
[Option 1] use an script to remove the pop-up
Use eihter wget or Git to download the script to Proxmox
Download the script with wget
1
2
3
4
5
6
wget https://raw.githubusercontent.com/foundObjects/pve-nag-buster/master/install.sh

# Always read scripts downloaded from the internet before running them with sudo
bash install.sh

# or ..
Download the script with Git
1
2
3
4
git clone https://github.com/foundObjects/pve-nag-buster.git

# Always read scripts downloaded from the internet before running them with sudo
cd pve-nag-buster && sudo ./install.sh
Uninstall
Here’s how to uninstall the scrip and re-add the subscription pop-up.
1
2
sudo ./install.sh --uninstall
# remove /etc/apt/sources.list.d/pve-no-subscription.list if desired
[Option 2] Manually remove the pop-up
1
cd /usr/share/javascript/proxmox-widget-toolkit/
1
cp proxmoxlib.js proxmoxlib.js.bak
1
nano proxmoxlib.js
Use Ctrl + w then search for = ‘active’
We just need to change !== to ==
from res.data.status.toLowerCase() !== ‘active’
to -> res.data.status.toLowerCase() == ‘active’
To save, use Ctrl + o then Enter and finally Ctrl + x
Now we need to restart the Proxmox service.
1
systemctl restart pveproxy.service
Refresh browser with Shift + F5 and the prompts should be gone.
If you want to revert our change you can use below command.
1
mv /usr/share/javascript/proxmox-widget-toolkit/proxmoxlib.js.bak /usr/share/javascript/proxmox-widget-toolkit/proxmoxlib.js
[Optional] Install Tailscale
1
2
curl -fsSL https://pkgs.tailscale.com/stable/ubuntu/lunar.noarmor.gpg | tee /usr/share/keyrings/tailscale-archive-keyring.gpg >/dev/null
curl -fsSL https://pkgs.tailscale.com/stable/ubuntu/lunar.tailscale-keyring.list | tee /etc/apt/sources.list.d/tailscale.list
We’ll setup a systemd service to point the port 8006 so we won’t need to add the port to the proxmox DNS name in the browser.
1
2
apt-get update
apt-get install tailscale -y
Create Auth Key - https://login.tailscale.com/admin/settings/keys
Select Generate auth key…
Enable Pre-approved and click Generate key Copy the key and replace TSKEYHERE in the command below.
1
tailscale up --authkey=TSKEYHERE --advertise-exit-node
Example of how the command should look like but use your generated tailscale key
1
tailscale up --authkey=tskey-auth-kV6T4GOx7BK1CNTRL-fpMLSnx3wm845uQEszvxm8FJmT3dJokQ --advertise-exit-node
Now we access proxmox from any device that has Tailscale with the ip or dns name and port.
However we can do it better.
We’ll add tailscale own certificate and auto serve the website from the port. runt bordUtdragbart bord Create tailscale.service file as below
1
nano /etc/systemd/system/tailscale.service
Add below in the file
1
2
3
4
5
6
7
8
9
10
11
[Unit]
Description=Tailscale Service
After=network.target

[Service]
ExecStart=/usr/bin/tailscale serve https+insecure://localhost:8006
Restart=always
RestartSec=3

[Install]
WantedBy=multi-user.target
1
systemctl daemon-reload
1
systemctl enable tailscale.service
1
systemctl start tailscale.service
Now you can access Proxmox with valid certificate without having to add the port at the end with the tailscale DNS name.
So for me I can access Proxmox from https://proxmox-guide.spotted-universe.ts.net
More information here: https://tailscale.com/kb/1017/install